Sunday, 12 January 2014

Next stop - instrument rating

Happy new year everyone.

"London" Oxford Airport
We are back home in the UK, Christmas binge over and the shock of the British weather has subsided. Some of us have got off to a 'flying' start with our new instructors on the next section of training — the instrument rating.

I've talked before about instrument flying (controlling the plane with no outside references). I've talked about asymmetric flight, check-lists and a little about radio navigation, holds and approaches.

The instrument rating is really about putting all this together at the same time.

By the end of this 10-week 50-flying-hour block we need to be able to convince a CAA examiner that we can plan and fly a twin engine aircraft on a complex route to public transport rules and standards, flying and navigating purely on instruments.

CAP 413; how to use the radio in
just 350 fun-filled pages.
We need to negotiate the complex UK airspace and deal with the UK's excellent but very formal air traffic controllers. We need to log our progress and write down lots of information. We need to quickly read and understand complicated approach plates. We need to do this on old fashioned analogue equipment without the help of an autopilot or GPS, and quite often we will need to do it with one engine 'failed'.

But most daunting of all we will need to do it completely unaided; the twin-engine single-pilot instrument rating test is quite possibly the most difficult flight we will ever undertake in our careers.

So far, we have been working in the simulators practising Oxford's departure, hold and arrival procedures, desperately trying to get everything together. There is never enough time, and as soon as some vital task diverts the attention, the plane will wander off course and off altitude almost like it is doing it on purpose.

The instructor assures us that with enough repetition things will become... not exactly easy, but possible.

Describing our flying in this section of the course is going to get unavoidably technical, but I will do my best to explain it. You can't understand radio instrument navigation without an idea of what the radio beacons and systems are and what they do, so here goes my attempt to explain.

The instrument approach


The approach is simply the phase of flight between arriving in the vicinity of the destination airport, and the point where you can see the runway in front of you in order to land visually.

The microwave landing system at Heathrow. That's an
A380 landing, so it's a fair bit higher than it looks!
This may be just a few hundred feet above the ground so clearly there has to be a way to arrive at the right place, at the right height and speed ready to land without being able to see outside. This is what instrument approach systems are for.

Almost all instrument approach systems use ground-based equipment to guide you in. GPS approaches are starting to appear but are still fairly new... 'new' in aviation being anything invented less than 25 years ago.

The cleverest approach system is the microwave landing system (MLS). First appearing in 1979, it also qualifies as a pretty new technology. It can guide the plane in via a whole range of different glide slopes and approach paths, is immune from interference and reflection problems, is reliable and accurate and is generally the bees knees.

Microwave systems were planned to replace earlier instrument landing systems at all major airports by 2010. In fact, only about three airports actually have one, and few planes have the equipment to use them.

So we don't get tested on MLS approaches.

The ILS is basically an invisible funnel of radio waves that
guide the pilot down the glide path to the runway
The next best system is the instrument landing system, or ILS, which has been with us since about 1938 so counts as a reasonably mature technology. You tune it in to a navigation radio just as you would with an FM radio station, and your instruments will indicate whether you need to fly left, right, up or down to get on the ideal three degree approach slope and centre line.

ILS has quite a few problems which I will leave you to read about on your own if you are interested, but it works well enough and has been installed at almost all large airports and many smaller ones worldwide. From the pilot's point of view it is reasonably easy to use, and we will be looking at ILS approaches next week

But ILS approaches are not considered difficult enough to be a 'real' test.

The microwave and instrument landing systems are known as precision approach systems, because they give guidance on height as well as direction. However it's perfectly possible to use simple radio beacon for directional guidance, the pilot taking care of the altitude. This is a non-precision approach and it's a bit more involved.

VOR stations like this are dotted around the country
at strategic points.
Of the two types of radio beacons that can be used for non-precision approaches, the newer and better one is the VOR. I really do my best to avoid acronyms in this blog, but I can't this time. VOR actually stands for VHF Omni Range — yes it is an acronym inside another acronym. (VHF stands for very high frequency, which is the type of radio waves that the FM radio in your car picks up).

VORs have been around since the forties, and there are about 3000 of them beeping away world wide. They send out two signals. One just splurges out equally in all directions, but the second is highly directional. By comparing the two signals, the equipment on board can work out the bearing from the beacon to your aircraft. You then know you are somewhere on an imaginary line that starts at the VOR and heads off in a specific compass direction, known as a radial.

The advantage of the VOR over the simple non-directional beacon (below) is that it works accurately irrespective of what the aircraft is doing. It can be heading in any direction, travelling in any direction or even be upside down and the reading will be steady and accurate, a small but useful advantage over the simple non-directional beacon.

But we don't get tested on VOR approaches either — still too easy!

Because there is one even more ancient and troublesome technology — the non-directional beacon (NDB). This is exactly what it sounds — a simple aerial sending out a blank carrier wave indiscriminately in all directions. They nothing more than an medium-wave radio station without the music. In fact medium-wave radio stations will work as non-direction beacons.

The Radio Magnetic Compass.
The yellow needle will point
towards an NDB, the green
one towards a VOR. We spend
hours staring at these needles.
There is no information contained in the signal from the non-directional beacon, but with a cunning arrangement of aerials on the aircraft it is possible to calculate where the signal is coming from. This drives a pointer on an instrument called an radio magnetic compass. All this pointer does is point to the beacon but this is enough, just, to enable entire holding and approach procedures to be flown.

First introduced in the thirties, non-directional beacons were supposed to be phased out decades ago, but are still with us. Mostly they are used for navigation but a handful of airports — including ours — use them for instrument approaches.

Compared to VORs, they are pretty tricky to use. Instead of a simple deviation bar telling you to fly left or right, you have a pointer on a compass face. You have to squint at it very closely to keep it within a degree or two, remember which end of the needle to use (the head when going towards the station, the tail going away) and work out which way and how much to turn when you are off course. You have to account for wind by flying just the right about of into-wind heading to keep the needle still.

They suffer from a multitude of errors — even nearby railway tracks can send them screwy. Most annoying of these is dip error. As soon as you bank the plane the needle veers off course, making it unreliable outside of straight and level flight. All in all, NDB approaches are a pain in the backside and most professional pilots would run a mile before they would attempt a NDB approach.

So guess which one we get tested on!

Here is part of the approach plate for the "Oxford NDB DME 19" approach, the one we use most often. DME stands for distance measuring equipment which is yet another type of radio navigation device which tells you how far away you are from something, in this case from the end of runway 19.

There are masses of information squeezed onto approach plates and they look a bit scary, but the basics are actually quite easy to decipher.


The airport is the little cross in the middle, and the round blob indicates the position of the NDB. The boxes show you what radio navigation facilities are available, what frequency they are and their Morse code identifiers (yes really, we do still use Morse code). In this case you can see that Oxford has both an NDB called 'OX' and a combined ILS/DME called 'IOXF'.

Extending down and right of the airport is a racetrack shape, this is the holding pattern. Normally the hold lines up with the approach and runway, but at Oxford the it is sort of bent off to one side to keep pilots well away from RAF Brize Norton.

Early attempt in the sim; room
for improvement!
To fly the approach, we arrive overhead the NDB from any direction and join the holding pattern, if necessary shuttling down to 3500'. Once we ready, we leave the pattern and fly off to the north on the outbound leg (the one marked CAT A & B), descending to 1800'. On reaching 6.5 miles away from the NDB, we hang a right and head inbound on a course of 194 degrees magnetic.

This course has to be held accurately accounting for wind and we have a few moments to get everything sorted before the final descent starts at 4.7 miles. Because this is a non-precision approach, we have to check our height every mile to make sure we are descending on the correct slope.

Eventually we will reach our minimum decision altitude. If we can see the runway, then we can go ahead and land. If not we have to go around and try again. This is called a missed approach and is indicated by the dotted line on the chart. Back to the hold and start all over again!

Well that's the idea anyway. There are a lot of checks and radio calls to squeeze into these very busy few minutes that make it a lot more difficult than it sounds... not that it sounds all that easy.

We should be flying some of these approaches for real this week. It's been over a month since I last flew a real aircraft so fingers crossed I can still remember how!

Monday, 9 December 2013

Commercial Pilot!

Another major milestone achieved; I have passed my combined commercial pilot licence and multi-engine class rating test on the first attempt. Already I have escaped the souless desert wastes of Arizona back to the damp, cold and crowded UK also known as HOME.

We won't actually get the licences for a little while yet, as we still require another thirty or so hours experience and an instrument rating, which is the focus of the next few months training back in Oxford.

Once that is complete, all the test passes including ground school will be sent off to the authorities in return for that magic scrap of paper. Technically known a commercial pilot's licence with multi engine and instrument ratings, it allows us to carry paying passengers and work as a first officer on large planes or as a single pilot on smaller machines. After we have clocked up 1500 hours experience it gets automatically upgraded to a full air transport pilot's licence.

The CPL test


A dawn take-off the day before the test
The test combined almost everything we have learned to date, and of course was done on the twin-engine Seneca which we have just barely got to grips with. Lasting about two and a half hours it's quite a gruelling examination but I was fortunate to once again be assigned my favourite friendly examiner.

After a full briefing of what we could expect from the test, I had a long and tense wait for my buddy to fly first. Eventually he returned and I was able to get started with my pre-flight inspection.

Once completed (happily no faults found) the examiner joined me in the plane where he assumed the role of an 'interested passenger' and I the pilot in command, which meant I was expected to give the safety briefing much like the one you have witnessed every time you have been on holiday.

After the take-off and departure, the first part of the test is a navigation exercise. Just one leg is required, flown by the visual 'dead reckoning' techniques we had practised so much. The requirements are to fly at all times within five degrees of the planned heading and 100' of the planned altitude, while arriving within three minutes of the estimate. No real difficulties there, except for the Seneca's annoying habit of climbing 100' every time you take your eyes of the instruments for more than ten seconds.

Towards the end of the leg, the examiner will ask for a diversion to an unplanned location. While flying the rest of the original route, I had a couple of minutes to plot the new course and figure out the new heading, altitude, time, minimum safe altitude and fuel required. We then fly the diversion leg with the same requirements, only this time we are allowed to use radio beacons to help us.

The first leg went perfectly, no surprise as we are pretty familiar with the area now. About half way along I passed near to a radio beacon commonly used for practising holds, and on making a radio call found there were indeed planes holding all the way up to 6000'. To avoid them I decided to try out a little trick I had heard about.

I flew for one minute at 60 degrees left of heading, then flew planned heading until I felt I was well out of their way, then flew one minute at 60 degrees right of heading. Done right, this puts you exactly back on track exactly one minute behind schedule. It worked well, and certainly pleased the examiner.

The diversion was not easy to find, some vague street patterns carved in the empty desert with few nearby features. As I reached my planned time I had little but cacti in front and started to get a little concerned, but then spotted the street patterns about a mile off to the left, within the required accuracy for the test.

Instrument flying


Next was probably my least favourite part, the instrument flying. On went the hood, the examiner took over the radios and lookout, and issued speeds, headings and altitudes playing the role of air traffic controller. Easy enough on a full set of instruments, the artificial horizon being the key. But before long, he began to cover things up to simulate various systems failures, eventually leaving just the speed, altitude and a thing called a turn coordinator* to fly with.

Limited panel; two of the most useful instruments 'fail'.
He then took control and several times put the plane in an 'unusual attitude' (but not this unusual) and asked me to recover 'expeditiously' to straight and level flight using just the remaining instruments.

The drill is to set power to full if speed is falling (meaning the nose is high) or power to idle if speed is increasing because the nose must be low. Then, quickly roll the plane to more or less level wings as best you can giving the strange behaviour of the turn coordinator.

Finally, arrest the climb or descent using whatever elevator input makes the altimeter needle stop moving. This is not easy, as the push/pull force required to hold the altitude is often radically different from what you might expect, and you must ignore all 'seat of the pants' sensations as they are misleading.

For example, recovering from a nose low attitude you would expect to need to pull up from the dive. In practice you mostly end up pushing pretty hard because you are flying fast, the plane 'wants' to climb to return to its trimmed speed and you have to stop it. By scanning rapidly between the three instruments, you can keep everything more or less in check and once the speed is back to normal, reset the power.

Compass turns followed, where I was asked to turn on to specific headings using the standby compass and/or timer and the limited panel of instruments. This sounds easy enough, but aircraft compasses are completely untrustworthy outside of straight, un-accelerated flight. During a turn they will stop, wander all over the place or even turn in the opposite direction. The answer is to turn at a specific rate — three degrees per second — using the turn coordinator and hold the turn for a specific time. With care, it's possible to consistently achieve within five degrees of the new heading.

While still under the hood the examiner asked for a position fix using radio aids, then removed the hood to reveal the outside world again. Happily I was pretty close the cross on my map.

Visual manoeuvres


The visual exercises are intended to demonstrate that you can confidently and positively control the plane in steep turns, steep climbs and at speeds right down to the stall. But they do tend to become more of a memory game, and I do feel the test focusses a bit too much on the elaborate procedures surrounding the manoeuvres rather than the actual handling of the aircraft.

But I'm not complaining; once learned, they are not difficult and got me one step closer to the end of the test.

I was not in the least bit surprised about what happened next; yes it was time for one engine to "go on fire". Again there's nothing difficult about the engine shut down drill — though you do need strong legs — but there are plenty of opportunities to throw away the test. Great care is required throughout the shut-down and restart to always state and touch the correct control; even pointing to the left fuel cut-off when the right engine is being shut down is enough to fail that section of the test.

I was a bit surprised when the shut-down drill failed to "extinguish" the fire, and an emergency descent was required. I'd been told that examiners are generally a bit nervous about this part of the test and usually just ask what actions you would take.

So down we went in a fast spiral, gear out, both engines throttled back and the altimeter unwinding alarmingly. The examiner was busy on the radio, the scenery was getting a bit close and I was about to terminate the descent myself when he finally gave the call "fire is out" and we could start the gradual climb back up to altitude on the live engine and restart the other one.

Circuits and landings


Phoenix-Mesa Gateway, previously known as Williams Gateway
and once a major military base
The final phase of the test! The examiner handed back the radios and told me to head to Phoenix-Mesa Gateway airport for touch-and-go landings. Once I had got the weather and run various check-lists, I radioed up Williams and was given a 'straight in' clearance.

This is the easiest type of approach but also the one we practice the least often. You can see the runway from miles away and just keep heading for it, the difficulty is knowing when to start the descent and when to run the checks that are normally done at specific places in the circuit.

The first landing was a normal full-flaps landing, followed by a circuit and then a flapless landing. There's nothing hard about a landing without flaps, except I seem to have great difficulty remember not to put the flaps in!

On the climb out from the flapless landing — guess what — yes the other engine "failed". Time for the engine shut-down drills again, this time just simulated, and a circuit and approach in asymmetric configuration. This time he asked me not to land but to demonstrate a single-engine go-around at 300'.

These take a bit of care, as when the power is brought back in the plane can yaw alarmingly. It needs to be kept under control and held level, staying over the runway centre line while the gear and flaps are retracted. Until this is done, there is not enough power to climb away.

Not breaking the sound barrier, in a 747, just a
lot of tail wind.
We made the short hop from Phoenix-Mesa Gateway to Falcon Field still on one engine, for a full stop asymmetric landing back on home turf. By now the sun had almost set, and turning onto final we had it full in the face. Visibility fell to almost nil, and I was relived when turning onto final I could just pick out the runway lights from the general glare. One final landing — nicely held off the way I know the examiner likes them — and it was all over!

I parked, tied down and headed inside for a quick debrief and lots of form filling, and then I was free to go.


The flight home was not booked for another four days, but a mad urge grabbed me and I threw everything into a suitcase in 30 minutes flat and got a lift to Sky Harbor on the off-chance... sure enough I managed to get a reserve seat and just a few hours after the test I was flying home. Stonking 180mph tailwinds hurried us the 5300 miles back into my wife's arms in record time.

Coming in!


* A turn coordinator is a bit of a bastard child of an instrument. Unlike the others there are no numbers and it has just one marking for a 'rate one' turn (three degrees per second or two minutes for a full circle). What it actually indicates isn't obvious, it's a kind of combination of roll (banking the plane over) and turn (changing direction).

The argument is that traditional turn indicators are slow to react because a plane does not turn the instant it is banked, the turn takes a while to get going due to inertia. The old turn indicator would, correctly, not indicate a turn immediately the plane was rolled but wait until it was actually changing heading.

It was felt this delay made it difficult to use when recovering on a limited panel, so the gyro was tilted up 30 degrees. This couples together the roll and yaw axes with the result that the instrument begins to indicate something as soon as you roll, but is only accurate in a steady turn. If you roll out of a turn smartly, it 'loops' all over the place making it frustrating to use.


Monday, 2 December 2013

And now for something completely different

The beast at Sedona Airport
I've always hated the term "bucket list," but if I had one, then touring around some classic Arizona highways on a massive Harley would be on it.

Happily I was able to take advantage of the enforced four-day Thanksgiving holiday to do just that, and even more happily a very generous friend actually lent me his massive BMW 1200 KT while he visited home, so I didn't even have to shell out for the hire.

OK it's not a Harley, it's about 40 years too modern for that. But the beemer is a true "full dresser" touring bike. It is huge. It is very heavy. It is brimming with gadgets.

It features cruise control, a stereo with CD changer, heated seats, heated grips, ABS, electric adjustable screen, a gear indicator, a fuel computer, shaft drive, a gigantic squishy seat, paralever suspension, tons of storage and — I kid you not — reverse gear and a make-up mirror.

I have to confess from this list of apparently superfluous gadgets, the only ones I did not find useful were the cruise control (I didn't go on any long straight roads) and the stereo (virtually inaudible at highway speeds). Oh, and the make-up mirror.

Route 1: Red Rocks of Sedona


Route 1: Sedona View Larger Map


The first trip was to the beautiful red rocks of Sedona, via route 87 and Payson. Although mostly a two-lane highway, this route snakes its way north and upwards between dramatic rock buttes and steep passes.

It is a bit unnerving being overtaken by giant RVs towing giant trucks at 90 mph in this kind of scenery, but the roads are so good they somehow get away with it.

After Payson I turned onto the smaller route 260 which weaves west and stays high, following the Mogollon Rim through evocatively named pioneer towns like Strawberry and Camp Verde.

The route is lined with natural and Indian sight-seeing attractions including Tonto natural bridge (pictured), Montezuma's Castle and the hilariously-named Wet Beaver Wilderness Area (not far from Dry Beaver Creek).

I had the road more or less to myself. The beemer is no sports bike and doesn't like to be chucked around,  but it will settle into a nice easy rhythm on the curves. There's loads of low down torque and engine braking so hardly any need to trouble the brakes or gear box to make steady, relaxed progress.

I didn't bank on it being quite so cold up in the hills (look! snow!), and I was very grateful for the heated seat and adjustable screen.

It can be raised up to cocoon you in a bubble of still, quiet air. The only problem being you then have to look through the screen, which is impossible when riding up-sun.

I just made it to Sedona Airport's amazing restaurant in time for my decadent five-course Thanksgiving lunch. If you are ever in the area, be sure to visit this excellent 'up-scale' restaurant.

I had hoped to come back via the amazing route 89 through quirky Jerome and hicky Wickenburg, but time and daylight were getting short and I had to settle for the same route home - not much of a hardship!

Route 2: Show Low and the Salt River Canyon


Route 2: Show Low View Larger Map

I managed an earlier start for the second route, and was rewarded by a face full of low sun and a screen covered in dew for the first stretch to Globe. But it was well worth it, as the route climbed and climbed through scenery full of pillow-shaped rocks, towers and cactii reminiscent of a Western movie.

I passed through strange half-dead mining towns Miami and Top of the World full of decaying Americana and a photographer's dream.

But the real treat was the Salt River Canyon at Seneca (funny that). A mini-Grand Canyon with huge spires and the river pounding away far below. The road winds all the way down, across an ancient bridge and back up the other side. The problem is where to look; at the hairpin bends or the scenery?


Just short of Show Low I reached cloud base and began to freeze. At 6300 feet, it had a true alpine feel, snow everywhere, pine trees and even small ski lodges. I stopped in an old-world diner for breakfast and to rewarm.

Thankfully the fog did not last too long, and halfway to Payson a weak sun returned. I was back on the 260 with its fast flowing curves and great views. The traffic thinned out and sped up and I was able to get into that only half-conscious flow, alert but distant, merging with the bike and the road. Sounds nuts I know, but you bikers out there know exactly what I mean.

A final stop at the pretty Saguaro Lake marina for lunch left just the familiar and fun Usury Pass back home to Phoenix with plenty of day left to spare.

So a big thank-you to my generous friend for the bike, and for all my other generous friends who chipped in to my Movember fund-raiser. £150 raised for the cause.

This coming week is a big one for my training; I have the last three lessons on the twin followed by the all-important commercial pilot licence test, as soon as Thursday if all goes to plan.


Saturday, 23 November 2013

Twice as nice


As you can see, we have been cursed with a spell of typical English weather that has temporarily halted all flying. I thought I'd take the brief respite to write about our latest challenge — flying the twin engine Piper Seneca.

Compared to the small single engine planes we have flown to date, the Seneca is a bit of a monster. It has nearly three times the power of the Warrior and flies 50% faster. There is a lot more equipment on board, like de-ice systems and autopilots and though a lot of it does not work, you at least get the feel of a 'real' aeroplane. I could — in theory — fly home in one of these.

You couldn't call our battered old examples glamorous or smart, but with a bit of imagination and a bit of a squint you can picture a couple of wealthy executives in the back being whisked off to their next meeting by, well, one of us. No longer are we just learning to fly ourselves around, suddenly there is the reminder that we are training as professional pilots. It won't be long before we will be piloting large and very expensive aircraft with paying passengers in the back. Scary.

Buddy at the controls looking forward to his first flight
I had been somewhat nervous about the additional weight, speed and complexity of the Seneca, but after extensive briefing and memorising lots of new check lists I finally got to try it out this week. I was first out of our group, so it was up at 4.30am to check in and complete the pre-flight checks.

Once we were all strapped in I took my time running through the unfamiliar before take-off checks before I finally got to say for the first time "starting no. 1 engine". Taxiing was tricky, with the rudder pedals connected to the nose wheel via springs only, and my progress to the run-up area was cautious and less than elegant.

The power checks in the run-up area revealed the first, and really only tricky part of operating the Seneca — the twin throttles. They are quite sensitive and moving them together while keeping the same power coming from each engine is far from easy. Unlike the Warrior, you can't just shove them to full either. The turbochargers will kick in too strong and "overboost" the engine, damaging it.

Onto the runway and line up, two quick check lists then it was time to release the brakes and open the throttles. The acceleration was rapid, much more so when the turbos kicked in. Between the vague nose wheel steering and inability to keep the throttles balanced my take off roll meandered all over the place, but almost before I had time to sort it out we were doing 77 knots and it was time to fly.

As soon as we were in the air, I could feel how stable the plane was and just how rapidly it climbed. No time to think though, there was the after take-off check list to get done before turning at 500 feet — which takes all of 35 seconds in this plane.

More knobs, buttons, levers and dials than you could shake a stick at.
The instructor was certainly right when he said it loves to climb. Levelling off was a challenge at first, each time I thought I had the plane nicely trimmed out at the right speed I would look away for a moment then find myself 100 foot higher. I'm not sure if it is turbo lag or something, but it really takes a while to set get it properly set up.

Once it was settled down it flew beautifully with minimal input from me. It was far less affected by rough air or thermals, and felt like it would hold its height and heading until it ran clean out of fuel. This would not take long, as it drinks about 22 gallons of avgas per hour. Not one for the environmentalists!

It took a while to get used to the constant speed props. No longer is the power set by choosing a engine speed, instead we set the pressure of the fuel/air going into the engine. The plane will automatically twist the propeller blades to keep the engines turning at the same rate, regardless of your speed through the air or the amount of power set. We are used to listening to the engine note for speed changes, so it is disconcerting to hear the same drone all the time. We also have to carefully tune the engine speeds to avoid irritating 'beat' frequencies.

We spent some time getting used to the plane and doing general handling practice, then it was off to Goodyear to fly some circuits and landings. The big moment! Rumours abound about how difficult it is to land, and how it will just 'fall out of the sky' onto the tarmac before you are ready.

Perhaps it was simply the quality of the instruction, but I didn't have a problem. Certainly the control forces are higher than we are used to — it's definitely a two-handed job to flare — but much to my relief I was able to set it down quite nicely each time.

We were doing "touch and go" landings, so the next part happened very fast. There was just time to retract the flaps and fiddle about trying open the throttles evenly and stay more or less straight when we were back to rotation speed and it was time to fly again. Around we went, another five circuits, each time I got a bit better with the check lists, but I never quite got on top of the touch-and-go checks.

Then it was time to literally fly home. The fun parts of having so much speed on tap is beating all those Warriors back to base!

Asymmetric flight


One of the nice things about the twin is its symmetry. The single engine aeroplane may look symmetrical, but its engine and propeller only rotate in one direction. This gives rise to all sorts of complicated effects that conspire to pull you off course to the left, and constantly varying amounts of right rudder are required to keep it straight.

On the Seneca, the engines rotate in opposite directions and everything is nicely balanced. You hardly need to trouble the rudder at all. Provided, that is, both engines are running.

Err.. shouldn't that propeller be, er, going around?
But barely had we got to grips flying with two engines when it was time to fly it one just one.

Pretty much all twin-engine planes can fly on a single engine, though with reduced performance. This is great because it means an engine failure does not necessitate an immediate landing, and you are allowed to fly out of range of suitable landing areas.

So much for the theory, actually flying with one engine is quite an experience. When an engine fails, the plane will veer off course, start turning towards to the dead engine, lose around three quarters of its power and descend.

Once back under control, the rudder forces to keep the plane straight can be huge, literally all my strength was needed when flying slowly at high power (think take off!).

The worst time an engine can fail is of course just after take off, so this is what we practice. We will get a few hundred feet in the air when suddenly the plane will lurch off one way or another — the pesky instructor has closed one of the throttles and covered them up so you can't see which.

We then have to control the plane, identify the failed engine, run through a whole load of extra check lists and fly the circuit with one leg jammed on the rudder. Just before the landing the instructor will return control of the 'dead' throttle for landing.

The scary part in a real engine failure is called the committal altitude. Once you have the landing gear down and the full flaps out, the single remaining engine simply does not have enough power to make you climb. You HAVE to land. There is no going around and trying again!

That's all for now. We are enjoying flying the twin but the pressure is really on. If all goes to plan, in around  two weeks I will be a qualified commercial pilot with a multi engine rating. Keep everything crossed for me!

2828L - the first twin engine plane I have flown.

Sunday, 17 November 2013

Farewell little Warrior...


It was quite an emotional day today — my last ever flight on the single engine Piper Warrior. Just a pleasant cross-country jaunt to make up the fifty hours "pilot in command" time required for the commercial pilot licence. It was an entirely uneventful flight on a lovely day, with a few clouds around to add interest and pretty up the sky and plenty of time to reflect on how far we have all come in the last five months.

Once our class have finished with them in a few weeks, the Warrior fleet will be sold off, replaced by the more modern Archer. Some of them have been in continuous use for flight training with the same school for over thirty years and it's a sad day to see them go

That flight was also the last time I will ever pilot an aircraft alone, at least in a professional capacity. From now on I will always be flying with an instructor or examiner or ultimately with a line captain in the other seat.

On Monday we start on the Seneca twin engine aircraft, a faster and much more complex beast. The training schedule is very intense with several hours flying per day for the next few weeks, leading up to our commercial pilot licence exam and twin engine rating.

And then at long last home to cold rainy England to see my family, friends and my wonderful and very patient wife. I miss you all.

The best part so far? Easy. Aerobatics in the Extra hands down.


Friday, 15 November 2013

Upset recovery training

Flying "under the hood"
I've just returned from progress test four*, our last exam in a single engine aeroplane. The whole test is "under the hood" meaning I could see only the instruments and not outside. After performing various basic manoeuvres, stalls and slow flight the instructor simulated a vacuum pump failure by covering up the artificial horizon and heading indicators with scraps of paper.

Using this limited panel of instruments, I demonstrated timed turns, which are done by flying an accurate rate of turn for a calculated time to end up heading in the required direction. Next I had to recover from "unusual attitudes" using just the limited panel instruments.

In this context, unusual attitudes are pretty tame, the nose will generally be within 20 degrees above or below the horizon and the wings within 45 degrees of bank.

An aeroplane can of course fly as much as 90 degrees nose up or down (straight to the sky or straight to the ground) and up 180 degrees of bank (upside down). This is the full range of attitudes that is actually possible, but normal training we are exploring just four or five percent of this envelope. In commercial aviation, it is even less.

So if we never experience the more extreme attitudes, how do we know how to react if we suddenly find ourselves in one? The answer is to strap in tight to a fully aerobatic stunt plane with a massively experienced instructor and do some...

...Upset recovery training


In three days of flying the awesome 300bhp Extra 300L fully aerobatic plane in all sorts of crazy attitudes and situations with APS training we were able to explore what happens way beyond our normal limits, both in terms of flying and what our stomachs could take! I should add that we were still nowhere near the limits of the aircraft, these things can take plus or minus eight g which is a lot more than I can.

So what is an aeroplane upset? Any time you are outside your normal operational limits for pitch, bank and speed, for whatever reason, you are obviously in an upset.

Less obviously, any time the plane does something you did not command on the controls, or does not do something you did command, it can be said to be upset. Most likely this is because you have stalled, but it could be a jammed or disconnected control surface or some other mechanical failure.

A stall occurs when the "angle of attack" — the angle at which the air hits the wing — is too great. It has nothing to do with speed, though trying to fly too slowly can certainly cause one. You can stall at any speed at attitude if you try (or if you don't pay attention) simply by pulling back too much.

We practice gentle stalls on our school Warriors regularly, and the results are an unspectacular nose drop, perhaps accompanied by one wing falling a little. The recovery is easy and equally undramatic. They are slow, stable, draggy machines designed to be easy to fly for students and amateurs.

Many aircraft do not do this. For example fast, slippery aircraft with thin swept back wings like the ones we should be flying in a year or so. In these machines, the stall can be sudden, violent and leave the aircraft in almost any attitude and falling fast.

One answer is simply to say "these aircraft shall never be allowed to stall," and go ahead and fit stick shakers, stick pushers, envelope protection and other funky gadgets to prevent the pilots being so stupid. But to err is human, and people are still dying because pilots lose control of even ultra-modern airliners because they stalled.

So this is what an Extra does if you stall it from a slipping turn. A slip, by the way, is a perfectly valid technique where the rudder is applied opposite to the bank angle. This makes the plane fly somewhat sideways, increases drag and increases descent rate. Very useful if you need to get down fast or fix a too-high approach to landing. A slip is a stall-resistant manoeuvre, look how hard I have to work to make the plane stall:


Look fairly dramatic? Compare this to a stall from a skidded turn. A skid is NOT a valid manoeuvre. A pilot will typically skid when trying to get around a turn faster using the rudder instead of banking over more. Reacting incorrectly to an engine failure on a twin engine plane can cause a skid too. Unlike the slipping turn when I really had to pull hard and ignore the plane shaking and complaining, this one had no warning at all...


If this happened on final turn, even with the excellent training we have just had, there is no room to recover before meeting the ground. The only answer is to fix it before it happens. We were told how to spot the skid (the slip ball moves to the high wing) and not to hesitate to fix the situation straight away, whether we are pilot flying or not. That's a lesson I won't forget in a hurry.

APS teach a fantastic recovery technique that's now drummed firmly into us; push, power, rudder, roll, climb. It works in almost every situation, even if you don't know how or why you got there. But there is one mode of flight where it will not help you — that is the fully developed spin.

This next video shows what a full spin looks like. We try various controls movements to escape, but as you can see none of them help and some make the spin faster. The only recovery that does work is the one I take at the end of the clip, although I fluff the calls a bit. Well, wouldn't you?


You can't see the altimeter very well in this video, but from the spin entry to when the instructor says "recover" we lose 4000 feet in 34 seconds! During the recovery I lose a further 1500 feet though I did better on subsequent attempts.

Being able to recover visually is one skill, but imagine you are flying happily along in the clouds when out of nowhere there is a thump and you are suddenly upside down. Panic? Freeze? Flail around on the controls? A week ago I'm sure I would have done something similar. But now...


That video shows the instructor using a snap roll to simulate the effects of wake turbulence — flying into the vortices left by a plane in front of you. I am under the hood here, eyes closed, not touching the controls and expecting a typical unusual attitude recovery. I manage to recover from violent inverted upset on instruments in only a few seconds. I am not trying to show off here — I am trying to show how invaluable this training really is.

Enough of the serious technical stuff. Part of the training is simply taking the fear out of being in unusual attitudes, having a "face full of dirt", and what better way to desensitise than trying our hands at some aerobatics?

Here is my first (and second) attempt at a Hammerhead. Sometimes incorrectly known as a stall turn, you pull vertically upward until you have almost run out of airspeed, then kick the rudder to rotate the plane sideways into a vertical dive (see picture on the right).

Sounds awful, but the whole thing happens close to zero g (yes, like in space!) and it is actually quite a gentle experience for the pilot until the pull-out at the end.


I also managed to fly some reasonable loops, Split Ss and Cuban 8s. To fly a Cuban 8 you do the first three-quarters of a loop,  roll back the right way up, pull up into another loop and do the same thing again. The full range of bank and pitch attitudes in a single manoeuvre.


Certainly not air show quality stuff, but I am very happy to have tried it.

If you have been to an air show recently, you may have seen a stunt pilot doing a vertical climb followed by a crazy tumbling manoeuvre. This is the Lomcevak (Czech for 'headache'). The plane is flown vertically until almost stationary, then some violent control input I don't understand causes it to do a gyroscopic precession around the rotating engine-crankshaft-propeller assembly. Or something. So when the instructor offered a demonstration, how could I say no? This one is certainly not gentle on the pilot or the plane!


It just remains to say a big thank you to the amazing staff at APS. All you pilots out there, private and commercial alike, think seriously about getting some upset recovery training like this. It may be expensive, but it might just possibly save your life and others too.

Before you go, please do consider donating a few points to the very worthy but under-sung causes of prostate and testicular cancer through my Movember page. I haven't quite made it to £100 yet, but even so, here it is at 14 days as promised. Pretty pathetic but I will keep trying...


* I passed by the way

Sunday, 10 November 2013

Hold it!

Have you ever wondered how your holiday jet is able to fly thousands of miles with no sight of the ground, descend into the clouds, manoeuvre around, hold, approach the airport and pop out of the bottom of the clouds at exactly the right place, speed and height to land?

The Buckeye VOR DME C hold and approach
pattern used in our training and tests
You might think GPS has something to do with it, and computers and of course autopilots. But no.

Instrument approaches pre-date all of those, and the essentials are simply the basic flight instruments, a nearby radio beacon, a radio instrument to pick it up and a printed chart of the approach procedure known as a plate.

And a lot of practice.

On the right you can see an approach plate, in this case to Buckeye Municipal Airport which is a tiny little public strip near our old base in Goodyear. This is a reasonably complicated plate, and there is a lot of jargon, but it is not as bad as it first looks.

The main part is simply a drawing of the procedure seen from above. It's not drawn to scale, but just gives the general picture. You arrive from wherever you like and fly to the little round symbol in the middle, which is a radio beacon. Then, you fly round and round the racetrack pattern until you are ready to approach and land. Next, you fly off five miles to the north west, descend a bit, turn around, descend a bit more, go back over the beacon and finally descend and head in the general direction of the runway on the right.

Underneath is a side view of the same approach, you can see that each part has a specific altitude. There is also a table that give the lowest altitude you are allowed to fly to as you approach the airport. If you still can't see the runway at this point, you must do the missed approach procedure. In this case, turn around to the left, climb, go back to the beacon and start flying round and round again.

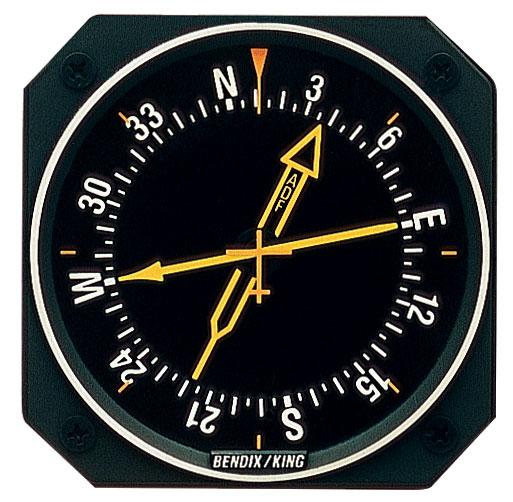
A radio magnetic compass. This model has two
needles, which track two different kinds of
radio beacon. Here, the plane is heading north. There
is a beacon off to the left and slightly behind, and another
ahead and just to the right.
The clever part is this whole procedure is defined and flown using just one radio beacon. In the aircraft the we have an instrument called a radio magnetic compass (RMI). It has a needle that simply points to the beacon, and around the outside is a compass card that rotates to show which way the plane is heading. Add in a stopwatch, and provided you remember to reset it every time you cross the beacon you can now pinpoint your position.

Sounds easy enough, but regular readers will have already guessed the next part... it's not that simple. Firstly, we are flying a plane with sole reference to the instruments, taking care of radio communications and performing various check-lists at the same time. Secondly, interpreting these basic instruments is not easy. And thirdly there is the wind to make the whole thing even more confusing.

Probably the most difficult part of the procedure is entering and flying the hold — the little race track pattern in the middle. A hold is simply a way to get an aircraft to stay in the same place for a while (aircraft, unlike every other vehicle ever invented, are physically unable to stand still.) It's something we are practising a lot at the moment.

Three ways to enter a hold, depending on
the direction you approach the beacon.
The hold always starts at a radio beacon, and it is defined by the compass direction (track) of the straight part heading towards the beacon. This has to be flown for a specific amount of time, usually one minute. Then the pilot turns — usually right — using a standard rate turn (three degrees per second), flies on the opposite heading for a minute. Another turn to the right and in an ideal world they are back on the inbound track one minute from the beacon.

The wind can make a right mess of this. If there is a cross wind component, you can correct for it on the way inbound by flying whatever heading keeps the needle pointing to the required ground track (the one on the plate). But to do this, you do need to get onto the correct track pretty early so you have time for the trial-and-error procedure required to find the heading. Confused? See blowing in the wind.

On the other three parts of the hold — the outbound leg and the two turns — you have no beacon to track to and hence no point of reference. In theory, if you needed a certain amount of correction on the inbound leg, say 5 degrees left, then you should need three times this amount on the outbound leg but in the other direction — 15 degrees right. This is because the wind is blowing you off course during both turns as well as the outbound leg, a total of three minutes of wind needs to be accounted for.

An early attempt at the Buckeye hold on a windy day.
You can see the strange shape of the turns caused
by the cross wind, and also where I got confused
and applied the wind correction the wrong way on one
of the circuits. The red blob is the beacon. The
wind appears to be from the south east here.
Head or tail wind components muck up your timing. In order to get the required one minute inbound, you have to adjust your time outbound. Again, it is trial and error though you do have some idea what to expect before you start from the winds aloft forecast. These are the purple numbers I have scrawled on the plate.

What you should end up with, after a few circuits, is a kind of egg-shaped pattern with the into-wind turn being tighter than the down-wind turn, and the outbound leg skewed to connect them together. What we tend to end up with is a right mess that looks like someone just dropped their knitting.

There is a lot more to it than this... there is the entry to the hold to get right, there are various 'gates' that are used to monitor your progress around the pattern and so on. I won't bore you with the whole lot, if you would like to find out more, here is a good explanation.

I have a couple more lessons to practice this on Monday before yet another progress test. Following this I have one final solo. That will be the last time I fly a single engine aeroplane on the course, as the following week we start on the Seneca. Apart from having two engines, it is fitted with retractable gear, variable pitch propellers, superchargers and flies about 50% faster than the Warrior. Twice as many knobs and levers and a lot less time to think!

I am also doing the APS upset recovery training course next week which should be an eye-opener. They use aerobatic Extra 300 stunt planes to explore all sorts of crazy flight attitudes and conditions from inverted to spins and of course how to get out of them.

It's going to be quite a week.

The next challenge; getting to grips with the Piper Seneca